‘Open Day’ . . .
As usual, Phil and I arrived at the workshop earlier than the others . . . which is understandable as Patrick drives back to Guildford each evening – and we started getting on with various tasks left over from yesterday. It seemed it was ‘visitors’ day at Richard’s workshop today as there was a constant stream of people popping in for one thing or another – mostly by mistake. It reminded me of the audition scene in The Commitments – we even had a dog in the workshop at one stage!
 |
| One of our visitors! |
Thanks to my rowing mate David’s question, I am reminded to talk a little bit about glue. It seems we use Titebond many times per day to stick together wooden surfaces. And gluing itself is yet another ‘dark art’. If you use too little the job won’t stick and too much means the job slips around as it is going together and there is a lot of ‘squeeze-out’ which needs to be cleaned up. Titebond is a good water-based glue and it can be cleaned up quite easily – in fact I am nearly an expert in removing squeeze-out. And Richard says you should always use a clean finger to tidy up the edges before glueing it down - but I never have a clean one left!
 |
| The sticky stuff |
Side Braces . . .
End Graft . . .
The next ‘major’ step involved making a decision about what king of end graft I wanted to insert (!) . . . this basically a way of tidying the bottom end of the sides and as usual there are many different ways in which the matter can be addressed. My solution was to insert a wedge of Indian Rosewood on the other grain to the sides with a narrow white separating line. This process involved using a router and a ‘special’ jig to remove the sides where they touch the tail block and then cutting two pieces of Maple veneer.
Next an oversized piece of Indian Rosewood is cut roughly to shape and then planed to be just under-sized. Once everything is lining up nicely the groove is cleaned out and the Rosewood and Maple are glued into place and the veneer is roughly planed down to size (so the clamps don’t crush them) and the whole thing is clamped into place and left to ‘cook’.
Once the clamps are removed it takes a reasonable amount of planing and sanding to get everything smooth again and looking nice.
 |
| Deciding what shape to have |
 |
| The wedge jig |
 |
| Routing the graft |
 |
| The routed graft |
 |
| Cleaning up the veneer |
 |
| All clamped down |
 |
| An aggressive sand |
 |
| Looking good |
Drilling the Holes . . .
A very minor step is to continue the (already drilled) neck block holes through the Indian Rosewood . . .
 |
| Finishing the holes |
Fitting the Front . . . My last task before gluing the back onto the guitar was to to complete the grooves in the top kerfing to allow the braces to fit snugly . . . which like fitting the back is a matter of trial and error. You measure and mark each groove as accurately as you can, put the top on (actually the sides go on the top so you can see what you are doing), note which one is stopping the top bedding down properly, take it all off, trim it, put it back on and keep repeating the entire process until the seat is good.
 |
| Grooving the kerfing |
Glueing the Back . . .
Now for the big moment – attaching the back to the sides of the guitar! After all this work it is a bit of an anti-climax as you simply put glue (just the right amount!) around the bottom edge of the kerfing and place the sides on the bottom and clamp it! Of course it takes a reasonable amount of care with the glue – making sure the grooves are also covered – and being pedantic about ensuring the whole thing has gone down well. It is then clamped up as tight as possible while making sure the clamps closely follow the shape of the guitar.
 |
| Nearly ready |
 |
| Just the right amount of glue! |
 |
| All clamped down |
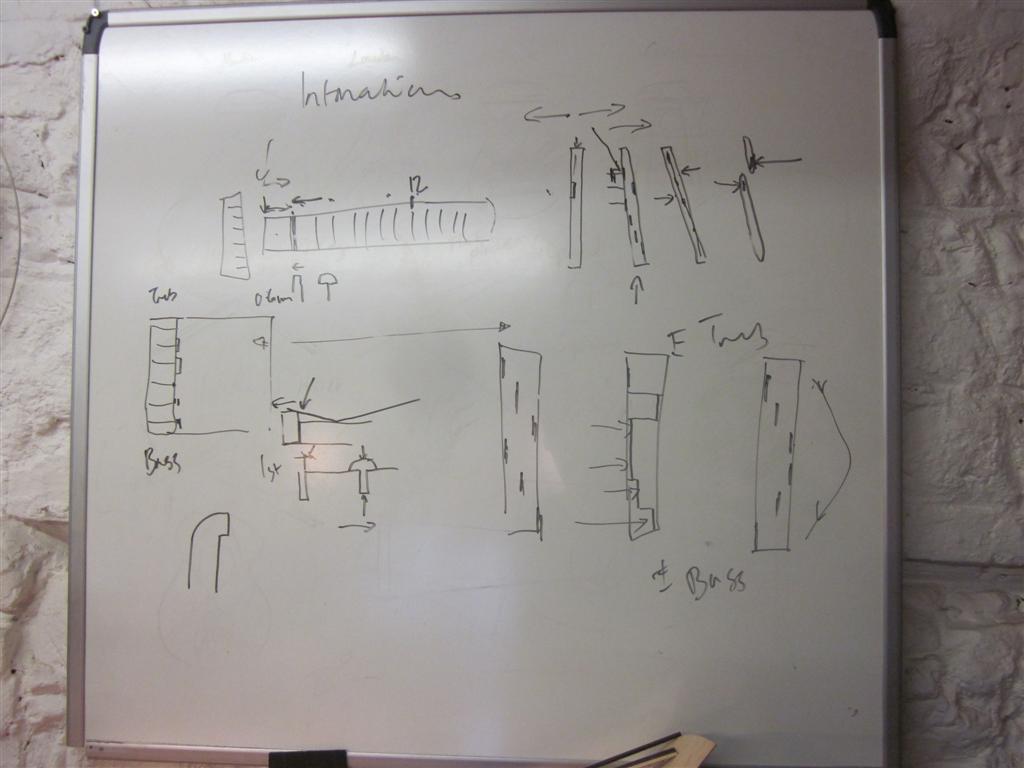
Today’s Chat - Inotation . . .
Inotation for guitars refers to the need for each string on the insrument to be a slightly different length in order for the notes to sound at the correct pitch when the strings are fretted (pushed down). Many things affect fretted instrument intonation, including depth of the string slots in the nut, string core diameter (seriously!), bridge saddle position and the position of the frets themselves.
On fretted string instruments, pushing a string against a fret—aside from raising the string's pitch because it shortens the string—also causes a slight secondary raise in pitch because pushing the string increases its tension. If the instrument doesn't compensate for this with a slight increase in the distance from the bridge saddle to the fret, the note sounds sharp.
Most electric fretted string instruments have individually adjustable bridge saddles. Some instruments have a floating bridge (not stuck down) and the entire bridge is jiggled about slightly to get the best overall intonation. Acoustic guitars like we are building need to have some pre-determined ‘intonation’ compensation when it is being constructed.
Richard also spoke about a guitar’s ‘temperament’ . . . but that might be a topic for another day.
 |
| Intonation |
More Decisions . . .
We are all at the stage of starting to work on our fretboards and necks and we need to make some decisions about ‘decoration’ – which fundamentally means the amount of binding (or not) that will go along the edge of the neck and the borders for the veneer that goes on the headstock. I will come back to that in a more refective way sometime later. We all started referring to the text books and Richard got some guitars out so we could all have a look and think about this subject . . .
 |
| Looking for inspiration |
 |
| Maybe like this? |
 |
| Or this? |
 |
| Or perhaps this? |
Moving on – the Fretboard . . .
My attention was now turned to preparing the fretboard and the neck – and it feels a bit strange not to be working on and thinking about the body! The first steps involved cutting slots in the fretboard (known as a fingerboard in stringed instruments without frets) – which is a very exacting process.
Clearly the frets need to be in EXACTLY in the correct place so that the guitar can be tuned and played. At the simplest level (ie mine!) distance between the 12th fret and the nut (near the head) and the saddle (which sits on the bridge and is were the strings attach to the soundboard) need to be exactly equal. And just in case you are wondering, exactly equal is very precise (withing half a millimetre) as the intonation compensation is one or two millimetres. The distance between the frets gets larger as you go towards the nut according to a well defined formula which goes something like dividing the string by the twelfth root of two which gives approximately 1.059463094 - which is the string-length position at which the next semitone pitch, or fret position, should be placed from the previous fret – but it is of course dependent on the overall length of the neck. It is best just to download a template from the web. After explaining all this Richard cut each of the fretboards using a special jig and ‘fretsaw’ blade. Phil's and mine are the same but Patrick's guitar is slightly longer. That said, Richard did show us a manual method of marking and cutting frets –but I think I might get a pre-cut fretboard the first time I build another guitar!
 |
| The fretboard jig |
 |
| Cutting the frets |
 |
| The manual jig |
Lewes Connections . . .
As you may well be aware, your humble daily blogger is an Australian who is building an American style guitar in Lewes. Our very detailed and comprehensive pub research has uncovered some lovely connecting themes that might be overly construed to make some totally meaningless links between the three places. The ‘Coat of Arms’ of HMS Lewes holds pride of place in the Lewes Arms – the ship was built in the USA and served as the USS Craven and the USS Conway, bought by the Brits and renamed HMS Lewes and late in WWII it sailed to Fremantle (where my family is from) and was scuttled off Sydney at the end of the war. Is this a tenuous thread or not? Unbelievably it was used as a ‘torpedo target ship’ . . . now that could have been a short career!
 |
| HMS Lewes - Coat of Arms |


No comments:
Post a Comment