So we all turned up bright and early to get on with our guitars and of course shared stories about what we all got up to on the weekend. Nick also came in for a bit of a chat and we all agree about the band the Contenders – so it was a bit like any workplace around the world on a Monday morning.
Back to Work . . .
My main focus for today was my top . . . and I quickly picked up from where I left off on Saturday. My initial task involved scalloping and shaping the various tone bars, treble braces and the cross struts (see how knowledgeable I suddenly am . . . I am learning from Phil!). I am reasonably experienced in this now (!) and took to it very easily and with some new found confidence.
The tricky bit is remembering how far down the scalloping should go on each brace as some are thinned (or should I say thicknessed!) with the chisel to 3mm, others 2.5mm, some 1.0m and others 0.0mm! It is best to write them very lightly on adjacent to each brace to be sure. All of this took most of the morning . . . a seemingly very long time for such a small job!
 |
| Reducing the braces |
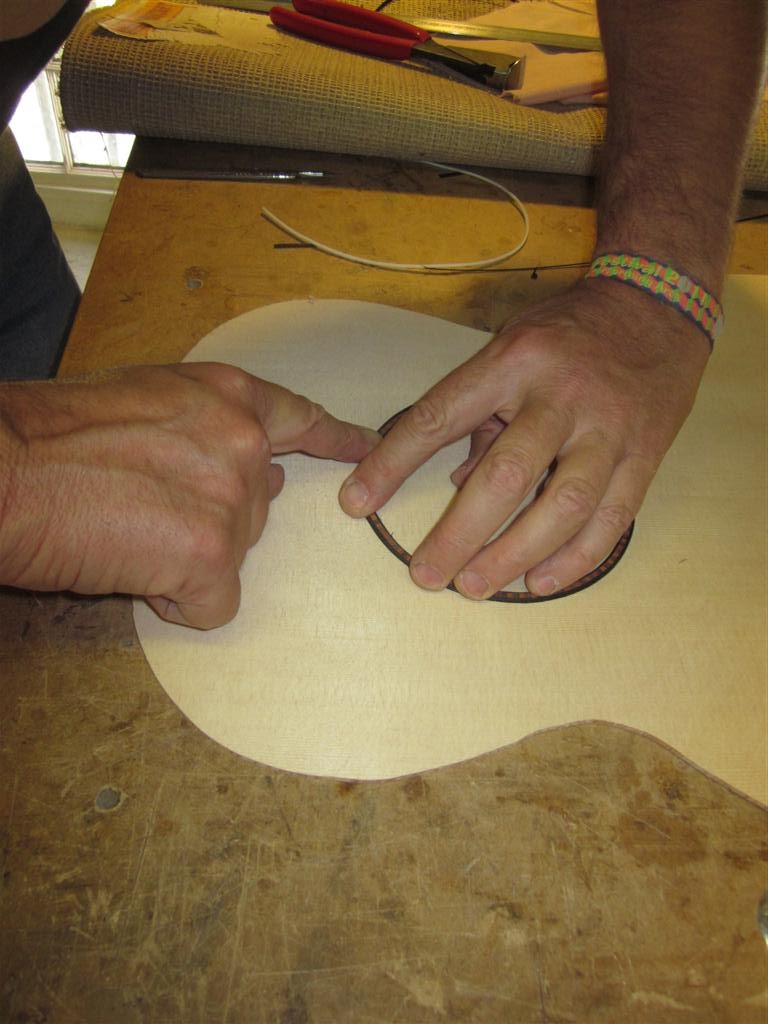
Sound Hole Bracing . . .
My next main task involved getting out the ‘shooting board’ and preparing ‘our’ sound hole bracing. I say ‘our’ because Richard had omitted to prepare these when he was compiling our materials and my task was to cut these for everyone. So Patrick and Phil will forever know that I fabricated a very specialised and important component of their guitars!
The first step in this process was to cut three strips of Spruce 4.00mm wide using the band saw and then thickness them down to 3.00mm . . . and then cutting the ones I was going to use to length and very carefully cut them out exactly to the shape marked on the guitar top using a chisel. I enjoyed this task so much I made and extra one – well actually, I cut it too short!
The second step is to chamfer the correct edges with block plane and chisel . . . and I also enjoyed this task so much that I did it again – I chamfered the wrong edge on one of them!
 |
| Shaping the cross brace |
 |
| Isn't that a beautiful thing! |
Glue the Neck and Heel Block . . .
The next job undertaking was one of those apparently simple but incredibly complex undertakings. While I was waiting for Richard I saw that Phil had started preparing his neck and heel blocks and I started to do the same thing . . . but luckily Richard spotted me in time which ensured that I did not put too much ‘rock’ in the joints with the sand paper!
Fundamentally these blocks need to match the curved surfaces of the sides (near the neck and the foot), so you use some specialised curved sanding blocks to match sand the neck and heel blocks to the correct curvature. I needed to make a few corrections with the block plane (cross grain . . . which surprised me) to the neck brace, but everything has turned out very well.
Once I was happy with the join (a number of times actually as Richard kept finding small imperfections) I glued them together. Luckily Patrick was available to help with this task as you need an extra pair of hands because the two components slip and slide all over the place as the pressure is increased with four huge clamps. Of course the match needs to be perfect.
 |
| Neck block clamped |
On with Cross Strut . . .
My next task involved cutting and planing the cross strut – which is the bit that goes right across the inside of the guitar above the sound hole. This is a relatively simple process to make but quite tricky to glue down as there is a risk the strut going on crooked. The solution is to use four clamps in a very particular way so the job goes together evenly and the strut stays upright.
Once the expertly prepared sound hole bracings and the cross strut were cut and planed to the exact shape they needed to be glued and put into our very favourite Gobar Box . . . which of course is a synonym for ‘this bit is finished’ and approved by Richard.
 |
| Gobar's box again! |
On with the Sides . . .
This is an especially exciting moment . . . I am about to ‘bend’ the sides of my guitar. I anticipated this and changed the moulds to the ‘Lacewing’ shape – I have the significant advantage of having seen both Phil and Patrick do this task last week.
The first job involved taking some more loving looks at the ‘straight’ sides and ensuring that they are ‘bookmarked’ the right way . . . which basically means making a choice about how you want the sides to match at the bottom of the guitar because that’s where it will be most visible. For clarity, the neck of the guitar (the top) will interrupt the apparent grain so the match will be a lot less obvious.
So it was down with all the clamps and springs on the bending device and turn it on for 10 minutes. The very thin super hot ‘electric blanket’ heats up very quickly and is ready for insertion of the sides in five minutes . . . which Richard did as a demonstration. The centre clamp is slowly screwed down as the timber heats up and becomes malleable – and then the other clamping devices are carefully put into place and then the machine is turned off and put aside to cool. The Indian Rosewood has a lovely smell when it is heated.
 |
| The last time you will see these flat |
 |
| Getting ready for the bend |
 |
| Bending under way - with Nick looking on |
Back to the Neck . . .
I took my glued neck out of the clamps and started preparing it for routing. The first task involved planing the sides of the neck block down to the same height as the neck itself – and doing it without introducing any unevenness in the surfaces! Exact planing is a skill I have not quite mastered – I think it must have something to do with the way in which you hold your tongue.
 |
| Preparing the neck block |
 |
| More planing - and then some more |
Back to my favourite noisy and brutal but ‘instant results’ machine . . . I needed to rout a channel for the truss rod. This involved setting up the router so that it was exactly in the middle of the face of the neck and routing down to an exact 12mm in 3mm stages. I was very happy with how this worked – so happy that I gave Phil instructions on how to set it up.
 |
| Routing the for the truss rod |
 |
| Master craftsman in action |
Bending the Other Side . . .
The last task of the day involved bending the other side – after taking my newly bent side out of the bender and looking at it adoringly . . . it is a special moment when something so obviously a part of the guitar is shaped to look like a guitar. The others shared my joy!
So it was back to heating up and inserting the other side into the bender and slowly bringing down all the clamps and screwing devices until everything was in place, unplugging it and putting it on the floor to cool.
 |
| How good is that! |
 |
| The next bend |
Collection of Components . . .
I feel as if I have made excellent progress on Saturday and today – and the pile of manufactured bits on my desk would support this. The back is ‘done’, the top is ‘getting there’, the sides are ‘bent’ the neck ‘under way’ as are the various blocks that support the inside the guitar. Onwards and upwards!
 |
| All done today |
 |
| All my bits together |
The Others . . .
From what I could see Patrick spent a lot of time on some more ‘bling’ . . . his main focus for the morning was to finalise his design and manufacture his logo (made from mother of pearl and which is inserted into the peg head) and the rest of the time focussing on getting his assembled sides down to the right height and curved shapes.
 |
| Working on the back |
 |
| Something we prepared earlier |
 |
| More bling |
 |
| Quick - you had better patent that! |
 |
| More on the sides |
 |
| Getting the curves just right |
Press Release – New Band Forming in Lewes . . .
This evening we met at the Lewes Arms with another group of would-be luthiers doing a Spanish guitar making course down the road with Richard’s friend Pablo. It was interesting chatting to them about the trials and tribulations they are having – although they are on the downhill run as it is the last week of their month long course.
And we all decided that we would form a new band called the Castle Precincts – see below for the first of the ‘street cred’ publicity shots. There is clearly a specialised niche in Lewes for a band with nine guitarists . . . let us know if you can drum or play bass! Being the true professionals that we are, Phil and I have outsourced some of our ale research to his friend Hywel . . . for example, did you know that ‘pubs’ came about when the King decreed that only one household per community could brew beer so he could keep enough of the men sober to go and fight a war, plunder another land or some such thing. And Hywel has given us the guzzlers' guide to ales in Lewis . . . if I can keep up with Phil!
 |
| THE CASTLE PRECINCTS |


Richard put me in the way of your blog. Really enjoyed reading it.
ReplyDeleteHope you enjoyed the beans!!